Busy vs Creamy Bokeh: Why Your Background Looks Nervous

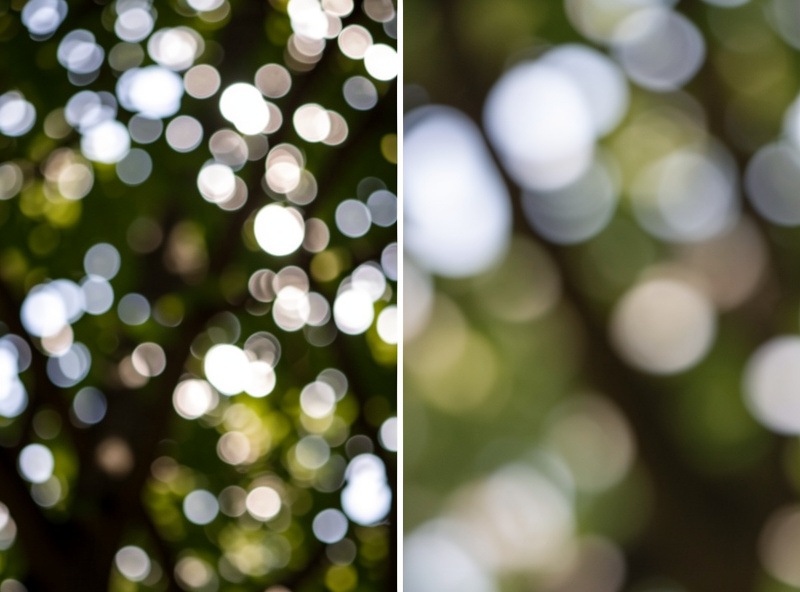
Busy bokeh looks nervous because each out-of-focus point of light is rendered as a hard-edged disc — often a bright ring with a darker center — and those outlines stack into doubled, fizzing lines. Creamy bokeh comes from discs that fade softly at the edge and melt together. The difference is one optical choice: how the lens corrects spherical aberration behind the focal plane. It is most visible wide open at f/1.4 to f/2 against a textured background a few meters back, and stopping down half a stop to a full stop usually calms the worst of it.
I can usually tell within one backlit test frame whether a lens will draw a calm background or a jittery one, and it has almost nothing to do with the price or the maximum aperture. A cheap lens can be creamy; an expensive, clinically sharp one can be nervous. Here is exactly what is happening, how to see it, and what to do when the lens you own is the jittery kind.
What “Nervous” Bokeh Actually Looks Like
Nervous bokeh — also called busy or harsh bokeh — shows up as background detail that refuses to dissolve. Out-of-focus branches double into two parallel lines, leaf edges sparkle with hard outlines, and bright points become rings rather than soft blobs. The eye keeps snagging on the background instead of resting on the subject, which is the opposite of what blur is supposed to do.
Creamy bokeh does the job blur is meant to do: it pushes the background into a soft wash of tone and color with no edges to grab attention. The technical name for the cause is the brightness distribution across a defocused disc. A smooth-drawing lens spreads that brightness so the center is bright and the rim fades to nothing; a nervous lens concentrates brightness at the rim. Once you know to look at the edge of the blur disc rather than the whole background, the diagnosis takes seconds.
The Real Cause: Spherical Aberration Behind the Focal Plane
Spherical aberration is the failure of a spherical lens surface to bring edge rays and center rays to exactly the same focus point. Every fast lens has some, and how the designer balances it in front of versus behind the focal plane decides the bokeh on each side.
If a lens is left slightly under-corrected, the rear (background) blur discs are bright in the center and dim at the rim — they overlap into a smooth melt. That is the deliberate signature of the classic “drawing” portrait lenses people pay a premium for. If a lens is over-corrected — which often happens as a side effect of pushing for maximum sharpness — the background discs become bright-rimmed with hollow centers. Stack thousands of those bright rings across a textured background and you get the nervous, doubled-line look. The cruel trade-off is that over-correcting for sharpness wide open and getting smooth background bokeh pull in opposite directions, which is why the sharpest-on-paper lens is not always the nicest renderer.
Why a Sharper Lens Can Have Worse Bokeh
This is the part that confuses people shopping by MTF chart. Modern lens design chases peak resolution wide open, and one path to that is correcting spherical aberration hard. But that same correction can flip the background discs from center-bright to rim-bright. So you end up with a lens that nails eyelashes at f/1.4 and renders the foliage behind the head like crumpled foil.
The “soap bubble” bokeh of certain lenses is the extreme of this — a perfectly outlined ring with a clear center, gorgeous on the right subject and distracting on the wrong one. None of this appears on an MTF curve, which only describes contrast at the plane of focus. It is why I never trust a sharpness chart to predict rendering, and why every lens I keep gets a backlit point-source test, not just a flat-wall resolution sweep. The full method is in my guide to what makes good bokeh in a lens.

Busy vs Creamy: A Side-by-Side Diagnosis
When I evaluate a lens, I score five visible traits. Here is how the two ends of the spectrum differ on each, so you can run the same check on your own glass.
| Trait | Nervous / Busy Bokeh | Creamy / Smooth Bokeh |
|---|---|---|
| Disc edge | Hard, bright outline | Soft, fading to nothing |
| Disc fill | Hollow or rim-bright | Evenly bright, center-weighted |
| Out-of-focus branches | Double into two lines | Dissolve into single soft shape |
| Eye behavior | Snags on background | Rests on subject |
| Underlying correction | Over-corrected spherical aberration | Under-corrected behind focus |
How to See It on Your Own Lens
You do not need a test chart for this one. Find a background with small bright points — a hedge with sky gaps, fairy lights, sun sparkling on water — put a subject a few meters in front of it, open the lens wide, and focus on the subject. Now zoom into the out-of-focus highlights on your screen. Bright-rimmed rings with hollow centers mean nervous bokeh; soft, evenly-filled blobs mean creamy. Do it again one stop down and you will see the rings firm up or smooth out as the iris changes the disc.
Run the same scene against busy, high-contrast foliage and you will see the doubled-edge effect directly: a calm lens turns twigs to mush, a nervous one keeps them as fizzing double lines. This five-minute test tells you more about how you will feel about a lens than any review score, because it is your subject, your light, your eye.
What To Do If Your Lens Renders Busy
A nervous lens is not a broken lens — it is a lens with a rendering signature, and you can work around it. Three moves help the most. First, increase separation: push your subject farther from the background so the discs grow large enough that even hard edges soften into the wash. This is the single biggest lever and it costs nothing — I cover it fully in getting more background blur without a faster lens. Second, choose calmer backgrounds: a plain wall or open sky gives a nervous lens nothing to fizz on, while dappled forest light is its worst enemy. Third, stop down a touch: half a stop to a full stop often tames the worst rim-brightness as the iris reshapes the disc, at the cost of a little depth of field.
You can also lean into it. A structured, slightly busy background reads as “place” in documentary and environmental portraits — sometimes the nervous lens is the right tool. And if a single point source is the issue, learn to shape it: my guide to bokeh balls and specular highlights covers placing and sizing those lights so the rendering works for you. If the busyness is specifically at the frame edges, that is usually a separate flaw — cat’s-eye bokeh — not spherical aberration, and it has its own fixes.

When Busy Bokeh Is Actually the Right Choice
The internet treats creamy as the only acceptable answer, and that is lazy. A glass-melted background erases context; sometimes context is the point. An environmental portrait of a craftsman at the bench wants you to feel the workshop behind them, not a featureless blur. A street frame wants the city legible enough to ground the moment. In those cases a lens with structured rendering — or simply less separation — tells the story better than a clinical f/1.2 wash.
That is the glass-first lesson under all of this: there is no universally best bokeh, only bokeh that suits the photograph. Smooth for clean subject isolation, structured for storytelling, and the judgment to know which the image in front of you needs. The aperture and exposure decisions behind that judgment tie straight to the aperture guide, and the broader question of which lenses render which way runs through my portrait lens recommendations.
Frequently Asked Questions
What causes busy or nervous bokeh?
Busy bokeh is caused by a lens being over-corrected for spherical aberration behind the focal plane, so out-of-focus discs become bright-rimmed with hollow centers. Those hard outlines stack into doubled, fizzing lines across a textured background instead of melting together.
Why does my expensive sharp lens have worse bokeh than a cheap one?
Chasing maximum sharpness wide open often means over-correcting spherical aberration, which flips background discs from center-bright to rim-bright and produces nervous bokeh. Sharpness and smooth rendering pull in opposite directions, so a sharper lens on paper can draw a busier background.
Can I fix busy bokeh in post-processing?
Not really. The rim-bright disc structure is baked into the optics. You can soften it by blurring the background in editing, but the cleaner fixes happen at capture: increase subject-to-background distance, pick a calmer background, or stop down half a stop to reshape the discs.
How do I test whether my lens has creamy or nervous bokeh?
Shoot a subject a few meters in front of small bright points like sky gaps in a hedge or fairy lights, open the lens wide, and zoom into the out-of-focus highlights. Soft, evenly-filled blobs mean creamy; bright-rimmed hollow rings mean nervous.
Does stopping down reduce busy bokeh?
Often yes, by a little. Closing the aperture half a stop to a full stop reshapes the defocus disc and can tame the worst rim-brightness, though it also reduces background blur by deepening depth of field. It is a trade-off, not a cure.
Is creamy bokeh always better than busy bokeh?
No. Creamy bokeh suits clean portraits where the background should vanish, but environmental and documentary work often benefits from a readable, slightly structured background that grounds the subject in a place. The right bokeh depends on what the photograph is trying to say.
Leave a Reply