How to Get More Background Blur Without a Faster Lens
You can get dramatically more background blur without buying a faster lens by changing three…

Foreground bokeh is the technique of placing something out of focus between your lens and your subject — leaves, grass, a fence, a window edge — so it blurs into a soft wash that frames the sharp subject behind it. It adds a layer of depth that background blur alone cannot, because it puts the viewer inside the scene looking through it rather than just at it. It works best wide open — f/1.4 to f/2.8 on my XF 56mm f/1.2 — with the near element within a few centimeters of the front element, so it dissolves completely instead of resolving into a distracting shape.
Most shooters obsess over the background and forget the half of the frame in front of the subject. That is a missed opportunity. A soft, colored veil in the foreground is one of the fastest ways to turn a flat, two-layer photo into something with real dimensionality — and it costs nothing but a change of position. After years of shooting workshop projects and portraits, foreground bokeh is the move I reach for when a frame feels static and I want it to breathe. Here is how to do it well.
A photograph has at most three planes: foreground, subject, background. Most people only blur the back one, which gives you a sharp subject floating on a soft backdrop — good, but flat, because there is nothing in front of the subject to establish that you are looking through space. Add an out-of-focus element in the foreground and suddenly the image has front-to-back depth: the eye reads the soft near layer, the sharp subject, and the soft far layer as three distinct distances, and the scene gains volume.
This is the same depth cue painters use with overlapping planes, except the lens does it with focus falloff instead of brushwork — the optical phenomenon photographers call bokeh, the aesthetic quality of out-of-focus rendering. The foreground blur also creates a sense of intimacy and discovery — the viewer feels like they have parted the leaves to find the subject. It is the difference between watching a scene and being placed within it, and it is almost entirely about where you put the camera.

The recipe is simple and physical. Find something to shoot through, get the lens very close to it, and focus past it onto your subject. The foreground element must be close to the lens — usually within arm’s reach, often just centimeters from the front element — because the closer it is to the lens, the more completely it dissolves into a smooth wash rather than a recognizable, distracting shape. Then open the aperture to thin your depth of field so the near element falls well outside focus.
Almost anything works as the foreground: tall grass, flowers, autumn leaves, a chain-link fence, a doorway edge, a colored object held just off the lens. I have shot portraits through a handful of leaves held in my own hand at the side of the frame. The key is that the element sits between the lens and the subject and is close enough to the glass to blur completely. The same separation logic that governs background blur, which I cover in getting more background blur, applies in reverse here: closeness to the lens, not to the subject, is what melts the foreground.
Open up for the smoothest foreground veil. A wide aperture thins depth of field so the near element blurs into pure color and tone with no hard edges; stopped down, that same element starts to resolve into recognizable, busy shapes that fight the subject. So this is a wide-open technique most of the time — f/1.4 to f/2.8 territory — which also means you will be managing the same wide-open flaws, like the cat’s-eye highlights at the edges, that come with shooting fast.
Longer focal lengths help too. A short telephoto compresses the planes and renders a foreground element as a larger, softer, more abstract wash, while a wide lens keeps more of it recognizable. For dreamy, painterly foreground blur I reach for an 85mm-equivalent or longer; for a subtler hint of foreground while keeping context, a 35mm or 50mm. The choice ties into the broader focal-length thinking in my guide to focal lengths, and the rendering quality of that blur is exactly the lens signature I unpack in what makes good bokeh in a lens.
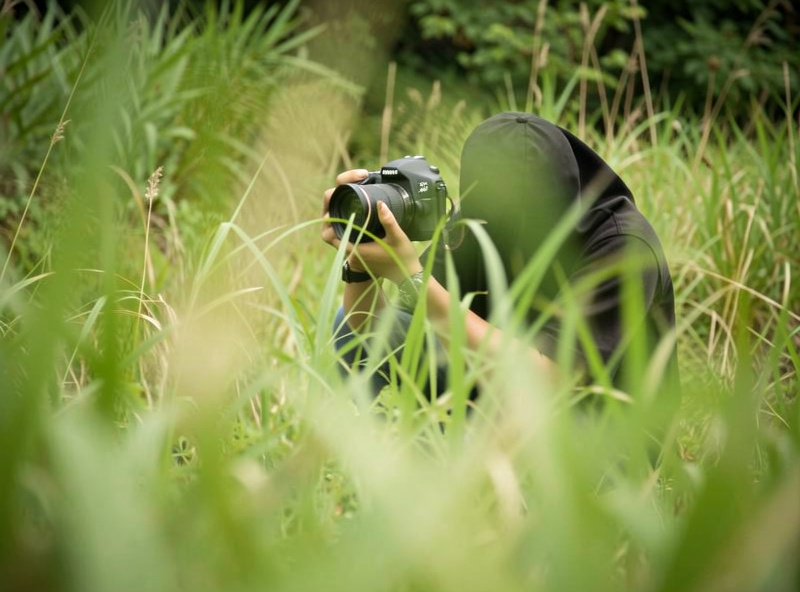
Foreground bokeh is most powerful when it does compositional work rather than just sitting there. Use it to frame: a soft arc of leaves across the top and one corner draws the eye inward to the subject, like a vignette made of blur. Use it to lead: a blurred line — a railing, a branch — angling in from the edge guides the gaze toward the sharp plane. Use it for color: a foreground element in a complementary or harmonious hue washes the edge of the frame with tone that supports the subject, warm greens around a portrait, autumn orange along the bottom edge.
Placement matters. A soft veil along the bottom or sides usually reads as natural and immersive; a blur dead-center across the subject’s face usually reads as a mistake unless you mean it. I tend to let the foreground occupy an edge or a corner and keep the subject’s key features clear of it, so the blur frames rather than obscures. And watch the light: a foreground element catching backlight glows beautifully, while one in shadow can muddy the frame.
Foreground bokeh earns its place far beyond portraits. In nature and garden work I shoot through nearer foliage to place the subject within the habitat rather than isolated from it. For product and workshop documentation — the leather pieces and builds I photograph on the bench — a soft foreground tool or shaving in the corner adds craft-context without cluttering the hero. In street work, shooting through a foreground crowd or railing builds a candid, embedded feeling. Even for the welded rig and the hydroponic tank, a blurred near element tells the viewer they are standing in the workshop, not looking at a catalog cutout.
It is one of those techniques that looks like expensive gear and is really just position and intent. The same camera that charts a 56mm portrait lens makes these layered frames with nothing more than a willingness to crouch, move in close to something, and shoot through it. Once you start looking for things to shoot through, you will find them everywhere — and your frames will stop feeling flat.
The technique fails in predictable ways, and all of them are fixable once you know to watch for them. The first is putting the foreground element too far from the lens: a few feet out and it no longer melts into a wash, it resolves into a recognizable, busy shape that competes with the subject instead of supporting it. Get the element right up against the front of the lens. The second is shooting too stopped down — at f/5.6 or f/8 the near layer sharpens up and the whole effect collapses, so commit to a wide aperture and accept the thin depth of field that comes with it.
The third mistake is letting the foreground veil the subject’s most important feature, usually the eyes in a portrait. A blur across the eyes reads as a technical error, not an artistic choice; keep the soft layer to an edge or corner and let the key plane stay clear. The fourth is ignoring the light on the foreground element: a dark, shadowed leaf in front of the lens just muddies and dims the frame, while the same leaf catching backlight glows and lifts the image. Position so your near element is lit, not in shade. And the fifth is overdoing it — one soft foreground layer adds depth, but stacking the frame with blur on every edge turns immersive into cluttered. Restraint reads as intent.
The complete picture uses both ends of the depth axis: a soft foreground to pull the viewer in, a sharp subject to hold them, and a controlled background to set the scene. Get all three working and a photograph gains a dimensionality that no single-plane blur can match. Foreground bokeh is the most underused of the three, which is exactly why adding it sets your work apart — most people simply never think to put something in front of the lens.
So next time a frame feels static, do not just blur the background harder. Look for a leaf, a railing, a flower, an edge — something to get close to and shoot through. Open the aperture, focus past it onto your subject, and let the near layer dissolve into a wash of color. It is the cheapest depth you will ever add to a photograph.

You can get dramatically more background blur without buying a faster lens by changing three…
If you only fix one thing in your kit, fix the glass. A camera lens…

Onion-ring bokeh is the fine concentric rings you see inside out-of-focus highlights on some modern…
Leave a Reply