Best Camera for Astrophotography: How to Choose
The best camera for astrophotography is the one with clean high-ISO performance, a true manual…
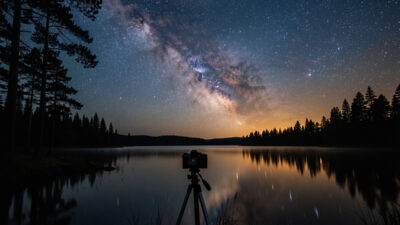
A star tracker is a small motorized mount that rotates your camera at the same rate the night sky appears to move, so stars stay as pinpoints during long exposures instead of trailing into streaks. With one, a 2–4 minute exposure at low ISO becomes possible, pulling far more detail and far less noise out of the Milky Way or a nebula than any fixed-tripod frame can. It is the single most transformative purchase once you outgrow untracked nightscapes.
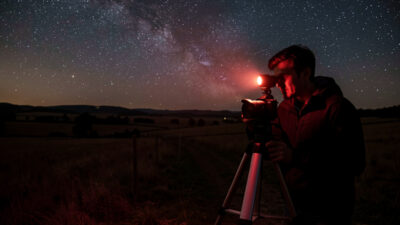
I added a compact sky-tracker to my kit specifically to shoot longer focal lengths cleanly — my XF 56mm and the 70-300 reach for tighter sky targets that trail in seconds on a static tripod. This guide covers what a tracker does, how polar alignment actually works, how to balance a payload, and where a camera tracker ends and a real telescope mount begins. For the wider context of how trackers fit the whole discipline, start with the complete astrophotography guide.
On a fixed tripod, the Earth’s rotation limits you to roughly 10–20 seconds before stars trail, which caps how much light you can gather in one frame and forces high ISO. A tracker removes that cap. Because the camera now follows the sky, you can expose for minutes at a low ISO like 800, collecting vastly more signal with far less noise. The difference in a deep-sky target — the Andromeda galaxy, the Orion nebula — is night and day: faint structure that simply does not register in a 15-second frame appears clearly in a tracked 3-minute one.
The catch is the foreground. When the camera tracks the sky, any stationary landscape blurs, because now the ground is the thing moving relative to the sensor. That is why trackers shine for sky-only and deep-sky work and complicate traditional nightscapes — for a tracked landscape you shoot the sky and foreground separately and blend them. If your goal is purely the Milky Way over a scene, you may never need one; the Milky Way photography guide covers the untracked approach. If you want tight, clean deep-sky targets, a tracker is the gateway, as the deep-sky beginners guide explains.
A tracker only works if its rotation axis points precisely at the celestial pole — the point in the sky the stars appear to rotate around, very close to Polaris in the northern hemisphere. This is polar alignment, and it is the skill that separates sharp tracked frames from subtly trailed ones. Most camera trackers include a polar scope: a small sighting tube you look through to place Polaris in the correct spot on a reticle, adjusted for the date and time.
The longer your focal length and exposure, the more precise the alignment must be. A wide 24mm lens forgives rough alignment for a minute; a 200mm reach demands it be dialled in or the stars elongate. From Sweden’s latitude I have it easy — the pole sits high in the sky and Polaris is straightforward to find. Closer to the equator the pole sits low near the horizon and alignment gets fiddlier. Practise the routine in your garden before a real session: level the tripod, set the tracker’s latitude, find Polaris, fine-tune azimuth and altitude until it sits on the reticle. Five careful minutes here saves a wasted night.
Every tracker has a payload limit — the maximum camera-plus-lens weight it can move smoothly and track accurately. Exceed it and the motor strains, tracking drifts, and stars trail despite good alignment. Lightweight trackers happily carry a mirrorless body with a wide or normal lens; heavier rigs and long telephotos need a sturdier tracker and, often, a counterweight to balance the load around the axis.
Balance matters as much as the weight number. An unbalanced load puts uneven strain on the motor and degrades tracking over a long exposure. For anything beyond a light wide-angle setup, a counterweight arm and a quality ball head between the tracker and camera let you position and balance the rig precisely. A flimsy tripod undoes all of it — the whole stack is only as stable as its legs, so pair a tracker with a genuinely solid tripod, as covered in the mirrorless tripod guide.
My own first painful lesson here was balance, not alignment. Early on I hung the 70-300 off a compact tracker with no counterweight, polar-aligned carefully, and still got faint comet-shaped stars in every two-minute frame — the unbalanced load was dragging the motor on one side of its rotation. A small counterweight to offset the lens fixed it instantly. The other rookie tax is the cold: on a sub-zero Swedish night the tracker batteries sag and the alignment can creep as the tripod legs contract, so I now re-check Polaris on the reticle every 30 to 40 minutes and keep a spare battery warm in an inside pocket.
| Tracker class | Typical payload | Best lens range | Who it suits |
|---|---|---|---|
| Ultra-compact | Light (body + small prime) | 14–50mm wide-field | Travel, Milky Way, first tracker |
| Standard camera tracker | Medium (with counterweight) | 24–135mm | Wide-field plus larger nebulae |
| Heavy-duty tracker | Heavier telephoto rigs | 135–300mm+ | Tighter deep-sky targets |
| Equatorial telescope mount | Telescope-class | Telescope optics | Serious deep-sky imaging |
As an Amazon Associate I earn from qualifying purchases. For a first tracker, a compact camera star tracker plus a solid ball head covers wide-field and larger targets without overspending.
A camera star tracker and an equatorial telescope mount do the same fundamental job — both follow the sky’s rotation — but they live at different scales. A tracker is built for a camera and lens, prioritising portability and quick setup; it tracks well enough for wide-field and moderate-telephoto deep-sky work but lacks the precision, payload, and guiding features for high-magnification imaging through a telescope. An equatorial mount is heavier, pricier, and far more capable, designed to carry a telescope and support autoguiding for very long exposures.
For a photographer using camera lenses, a tracker is almost always the right starting point and often the permanent answer. You only need a full equatorial mount when you commit to imaging through an actual telescope at long focal lengths. If you are weighing that jump — telescope optics, mount precision, autoguiding — my friends over at TelescopeSpecs cover dedicated telescopes and equatorial mounts in the depth that question deserves. And if you are still deciding between a camera lens and a telescope in the first place, the camera lens vs telescope guide lays out the trade-offs.
Keep your first tracked night simple: a wide or normal lens, a single bright target, and modest exposures. Level the tripod, mount the tracker, polar-align carefully, balance the camera, and start with 60–90 second exposures at ISO 800 to confirm your alignment holds without trailing. Check a test frame at full magnification — if stars are points, lengthen the exposure; if they elongate, refine the polar alignment before going longer. Then shoot a series of frames to stack later for a cleaner result.
Do not chase a tiny galaxy with a 300mm lens on your first outing — that demands near-perfect alignment and will only frustrate you. Build up: master tracked wide-field first, then step to larger nebulae with a normal lens, then reach for telephoto targets once alignment is second nature. The reward curve is steep and deeply satisfying. To choose the glass for each stage, the astrophotography lens guide covers what works at each focal length, and the beginner astrophotography guide is worth revisiting if any of the fundamentals feel shaky.
A star tracker is a motorized mount that rotates your camera to match the sky’s apparent movement, keeping stars as pinpoints during long exposures. This lets you shoot multi-minute exposures at low ISO, gathering far more light and detail with much less noise than a fixed tripod allows.
Not for traditional nightscapes with a landscape foreground, where a fixed tripod and short exposures work well. A tracker becomes valuable for sky-only Milky Way detail, longer focal lengths, and deep-sky targets that need exposures longer than a tripod allows.
Polar alignment means pointing the tracker’s rotation axis precisely at the celestial pole, near Polaris in the northern hemisphere, usually using a built-in polar scope. Accurate alignment is essential; the longer your focal length and exposure, the more precise it must be to avoid star trailing.
With good polar alignment, a camera tracker easily handles exposures of one to several minutes at wide and normal focal lengths. Longer focal lengths require tighter alignment and shorter sub-exposures, which are then stacked together for the final image.
They share the same purpose but differ in scale. A camera star tracker is portable and built for a camera and lens; an equatorial telescope mount is heavier, more precise, and designed to carry a telescope with autoguiding for high-magnification deep-sky imaging.
The best camera for astrophotography is the one with clean high-ISO performance, a true manual…
The fastest way to your first real astrophotograph: put a fast wide lens on any…
Astrophotography for a photographer is simpler than the telescope crowd makes it look: a fast…
Leave a Reply