Beginner Astrophotography Guide: Your First Night Under the Stars
The fastest way to your first real astrophotograph: put a fast wide lens on any…
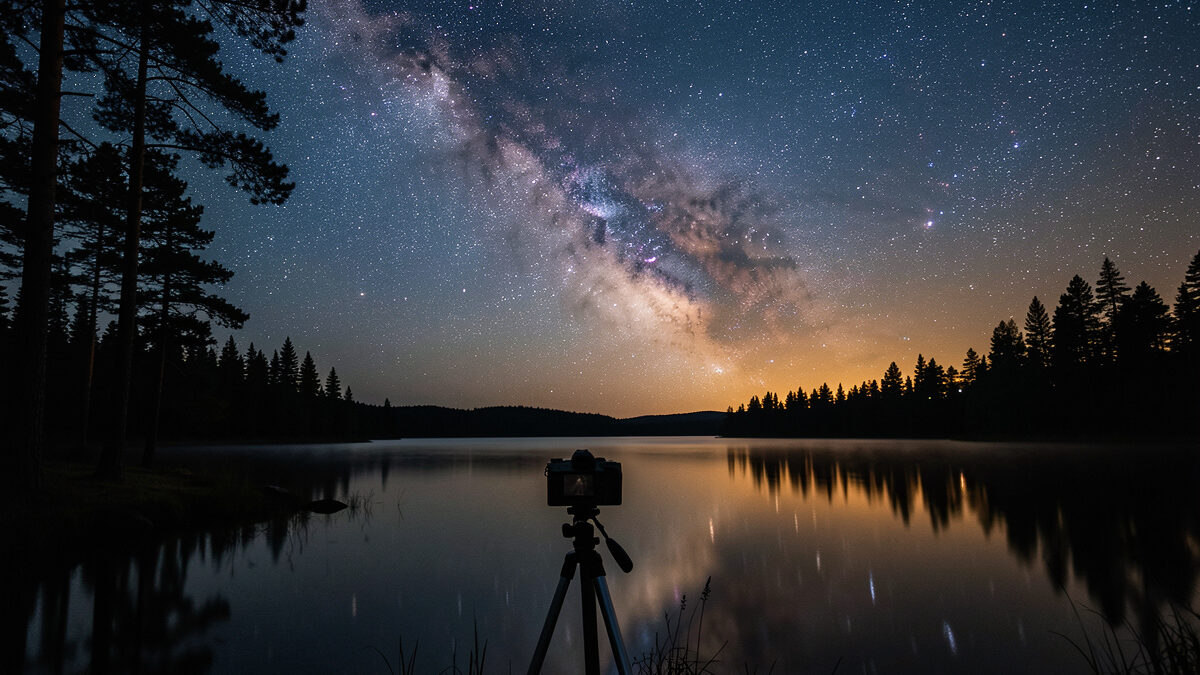
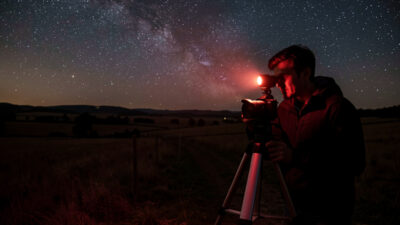
Astrophotography for a photographer is simpler than the telescope crowd makes it look: a fast lens, a sturdy tripod, and a clean high-ISO file (think ISO 3200, f/2.8, a 20-second exposure) get you a printable Milky Way frame on your very first clear night. You do not need a telescope to start — you need light discipline and a focal length that fits the sky you want.
I came to the night sky as a glass-first shooter, not an astronomer. The same Fujifilm X-T5 and Sony a7 IV that chart a 56mm portrait lens on my test wall are the bodies I point at the stars, and the lessons transfer cleanly: focal length first, body second, light always. This guide is the map for the whole cluster — where each piece of gear matters, what settings actually move the needle, and which “rules” are pixel-peeper theater. Every linked guide goes deeper; this one keeps you from buying the wrong thing first.
There are two distinct disciplines hiding under the word “astrophotography,” and the gear splits hard between them. Wide-field nightscapes — the Milky Way arching over a foreground — use wide, fast lenses (14–35mm equivalent), short exposures, and often no tracker at all. Deep-sky — galaxies, nebulae, star clusters — uses longer focal lengths, a tracking mount, and stacked exposures measured in minutes. About 90% of people who say they want “to shoot the stars” actually want the first one.
Knowing which road you are on decides every purchase that follows. If your dream frame is the core of the Milky Way over a Swedish lake, you live in the wide-field world and a tracker is optional. If you want the Andromeda galaxy filling the frame, you are heading deep-sky and a star tracker stops being optional. Most photographers — me included — start wide and only drift toward deep-sky once the basics are muscle memory. Read the dedicated Milky Way photography guide for the first road and the deep-sky guide for beginners for the second.
Priority order is the most useful thing I can give a beginner, because the marketing pushes it backwards. For astrophotography the spend ranking is: a fast wide lens, a genuinely stable tripod, a body with clean high-ISO, then — only if you commit to deep-sky — a star tracker. Notice the body is third. At ISO 6400 the gap between a $900 sensor and a $3,500 one is far smaller than the gap between an f/2.8 lens and an f/1.4.
Here is how I rank the building blocks and why, before we drill into each in its own guide.
| Component | Why it matters for the stars | Priority | What I run |
|---|---|---|---|
| Fast wide lens | More aperture = more photons in a short exposure; wider = longer shutter before stars trail | 1 (highest) | XF 23mm f/1.4; Sony 24-70 f/2.8 at 24mm |
| Tripod & head | Every astro frame is multi-second; the tiniest shake smears every star | 2 | Carbon travel tripod + geared head |
| Camera body | Clean high-ISO and good RAW latitude help, but matter less than glass | 3 | X-T5 (40MP APS-C), a7 IV (full-frame) |
| Star tracker | Only for deep-sky / long single exposures; lets the mount follow the sky | 4 (optional) | Compact sky-tracker for the 56mm & 70-300 |
| Intervalometer / app | Triggers long exposure sequences without touching the camera | 5 | In-body interval timer + remote |
As an Amazon Associate I earn from qualifying purchases. If you are assembling a kit from scratch, a compact camera star tracker and a wired intervalometer are the two accessories that punch above their price once you are past your first session.
The body you already own is almost certainly good enough to start. Any mirrorless or DSLR from the last decade that shoots clean RAW at ISO 3200–6400 will produce a printable nightscape. The full-frame advantage is real but modest: roughly a stop of cleaner high-ISO and a touch more shadow recovery, which on my a7 IV shows up at ISO 12800 where my APS-C X-T5 starts to get gritty. That is a refinement, not a gatekeeper.
Where bodies do differ for astro is in the boring stuff: a long-exposure / bulb mode, a built-in intervalometer, an articulating screen so you are not lying in frost to compose, and good battery life in the cold. Sensor resolution is a wash — 40MP gives me cropping room but also smaller pixels that show noise sooner, so it cuts both ways. For the full breakdown of sensor size, pixel pitch, and which features matter at night, see the best camera for astrophotography guide, and if you are still on your first body, the beginner mirrorless guide and broader camera body buying guide cover the fundamentals.
This is the part body-obsessed reviewers skip and it is the part that actually decides your photos. For nightscapes you want two things: a wide field of view and a fast maximum aperture. Wide lets you use a longer shutter speed before the stars start to trail across the frame; fast lets you keep ISO down. The sweet spot for most full-frame shooters is 14–24mm at f/1.4–f/2.8; on APS-C, think 10–16mm. My widest fast option is the XF 23mm f/1.4 — a 35mm-equivalent that is tighter than ideal but razor-clean — and on the Sony I open the 24-70 to 24mm at f/2.8.
What separates a good astro lens from a bad one is coma: the way point sources of light smear into little wings at the edges of the frame when you shoot wide open. A lens can be tack sharp in daylight and fall apart on stars. I test for this with a backlit point source on my chart and then prove it on the actual sky, because the edges are where cheap fast glass shows its true character. The whole lens question has its own deep cluster: start with the best lenses for astrophotography buyer guide, then read what lens speed actually buys you, coma and astigmatism explained, the best wide-angle lens for the Milky Way, and the prime vs zoom decision. If you shoot Sony or Canon specifically, the Sony vs Canon astro lens comparison is worth a look.
A star tracker is a small motorized mount that rotates your camera at the same rate the sky appears to move, so stars stay pinpoint during long exposures instead of trailing. With a tracker you can shoot a single 2–4 minute frame at low ISO and pull astonishing detail out of the Milky Way core or a nebula — exposures that would smear into streaks on a fixed tripod. Without one you are capped at roughly 10–20 seconds before trailing, depending on focal length.
You do not need a tracker for foreground nightscapes (a moving sky behind a static landscape actually complicates a tracked shot), but the moment you want longer focal lengths or deep-sky targets, it becomes the single most transformative purchase. Polar alignment — pointing the tracker’s axis at the celestial pole — is the skill that makes or breaks it, and from Sweden’s latitude the pole sits conveniently high. The full setup, alignment, and payload-balancing workflow lives in the star tracker guide for astrophotography. If you are weighing a tracker against an actual telescope mount, my friends over at TelescopeSpecs cover dedicated equatorial mounts and telescope optics in depth — that is the right resource once you outgrow a camera tracker.
Dialed-in settings turn mediocre gear into good photos faster than any purchase. The starting recipe for an untracked nightscape: manual mode, the widest aperture your lens stays clean at (often f/2.8 even on an f/1.4 lens, stopped down one stop to tame coma), ISO 3200 as a baseline, and a shutter speed from the 500 rule or, better, the NPF rule.
The 500 rule is the quick version: 500 divided by your full-frame-equivalent focal length gives your maximum seconds before visible trailing. At 24mm that is about 20 seconds; at 35mm-equivalent (my XF 23mm) it is about 14. The NPF rule is the precise version that accounts for your sensor’s pixel pitch and is stricter on a high-resolution body like my 40MP X-T5 — on dense sensors the 500 rule lies and you will see trailing it promised you would not. Focus is the other make-or-break: switch to manual, magnify a bright star on the rear screen, and rack focus until it is the smallest possible point. The dedicated manual focus for the night sky guide walks through this, and the broader night photography guide covers long exposure technique end to end.
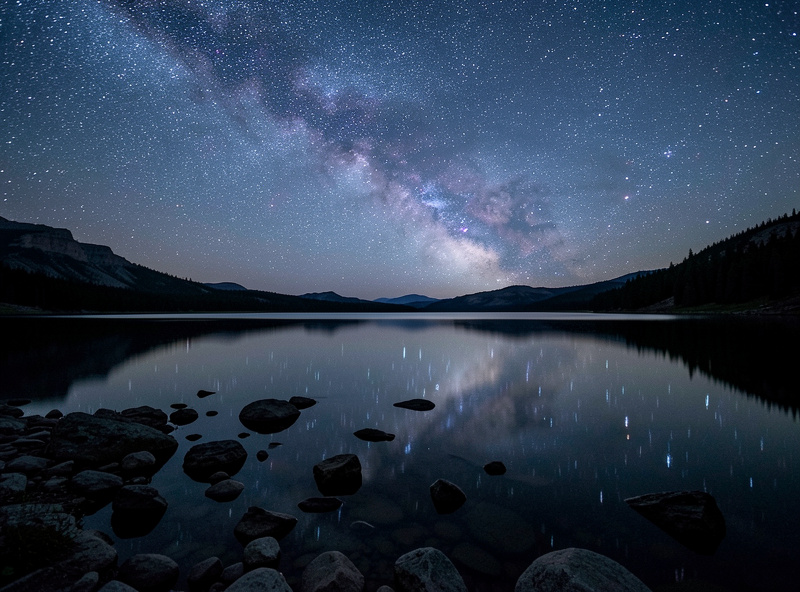
The darkest sky you can reach beats any gear in your bag. Light pollution is the single biggest limiter on what you can capture — from a city you might pull a few hundred stars; from a genuinely dark site you get the dust lanes of the galaxy. I plan every session around three things: a new-moon window (moonlight washes out the Milky Way exactly like light pollution does), the galactic core’s position for the season, and a Bortle-scale dark site I can actually drive to.
Apps do the heavy lifting here — a planetarium app to find where the core rises, a light-pollution map to pick a site, and a weather model for cloud cover and transparency. In Sweden the catch is the calendar: from roughly late May to mid-July the sky never gets astronomically dark at my latitude, so the Milky Way season is effectively autumn through spring. Long blue hours are a gift for foreground light but a curse for true darkness. Plan around your own latitude’s astronomical twilight or you will drive two hours to a grey sky.
If you are hunting a first dark site, the Bortle scale is the shorthand the whole hobby uses — a 1-to-9 ladder running from a pristine wilderness sky down to a washed-out inner-city one — and a non-profit like DarkSky International certifies and maps dark-sky places that are genuinely worth the drive. My own rule of thumb, after years of chasing darkness across southern Sweden, is blunt: a Bortle 4 site forty minutes away beats a Bortle 2 site three hours off, because the site you will actually return to twice a month teaches you far more than the perfect one you visit once a year. Consistency of practice outranks the last stop of sky darkness every single time, and it is the cheapest upgrade in the genre.
A single astro frame is only half the picture; the detail comes out in processing, and often in stacking. Stacking means shooting many identical frames and averaging them in software, which cancels random noise and lets you push the file far harder than one frame allows. For untracked nightscapes you can stack the sky portion alone; for tracked deep-sky it is standard practice to stack dozens of sub-exposures plus calibration frames.
I develop everything in Lightroom Classic — no deep compositing — and shoot to the right (ETTR) where I can to protect shadow detail, because the night sky’s data lives in the shadows and that is exactly where noise hides. The core moves I make: set white balance for neutral-to-cool stars, lift shadows carefully, control highlights on bright stars, and use masking to separate sky from foreground. Restraint matters; the fastest tell of an over-cooked astro shot is a sky pushed so hard the noise reduction has turned it to plastic. For the absolute basics of working after dark and protecting your files in the field, my field power guide keeps the camera and laptop alive through a cold all-nighter.
Most failed first sessions trace to a handful of avoidable errors, and none of them are about the camera. The big ones: leaving the lens on autofocus (it hunts uselessly in the dark and locks on nothing), shooting JPEG instead of RAW (you throw away the shadow latitude the whole genre depends on), trusting the 500 rule on a high-resolution body, forgetting to turn off in-body stabilization on a tripod (it can introduce micro-jitter), and overcooking the file until the stars look painted on.
The other classic is gear panic — believing you need a $3,000 body and a telescope before you start. You do not. A used fast wide lens, a tripod you already own, and one genuinely dark night will teach you more than any amount of spec-sheet reading. Shoot, review on the histogram, adjust, repeat. The fundamentals carry across every camera you will ever own. For a structured first night, follow the beginner astrophotography guide step by step.
One of the quiet advantages of coming to astrophotography as a generalist is that almost nothing you buy is single-purpose. The fast wide lens that frames the Milky Way is the same lens I reach for in cramped interiors and environmental portraits. The carbon tripod that holds a 20-second exposure rock-steady is the one I use for long-exposure water and product work. The intervalometer that fires a star sequence also drives a daytime time-lapse. The only genuinely astro-specific purchase in the whole chain is the star tracker — everything else earns its keep across the rest of your photography.
That matters for how you should spend. I would rather a beginner buy one excellent fast prime that lives on the camera year-round than a cheap ultra-wide that only comes out twice a year for the stars. The same camera that documents a welded workshop rig or a sourdough crumb shot can chart a 56mm portrait lens and then point at the galactic core — the gear is a system, not a pile of niche tools. Buy for the overlap, and the night sky becomes an extension of the kit you already trust rather than a separate, expensive hobby.
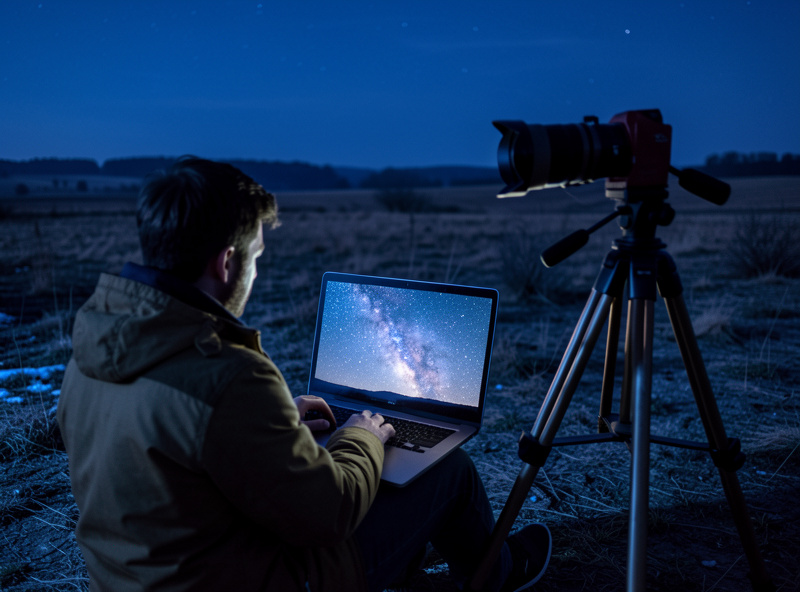
The single most useful habit at night is ignoring how the photo looks on the rear screen and trusting the histogram instead. A night exposure always looks brighter on a dim LCD in the dark than it really is, and beginners chronically underexpose because of it. The data you need to recover the Milky Way lives in the shadows, so I expose to the right (ETTR) — pushing the histogram as far right as I can without clipping the brightest stars — and pull the brightness back down in processing. An underexposed night frame pushed in Lightroom is a noise factory; a properly exposed one cleans up beautifully.
In practice that means I check the histogram after the first frame, not the picture. If the bulk of the data is crammed against the left wall, I raise ISO or lengthen the shutter (within trailing limits) until the hump moves toward the middle-right. This one discipline does more for image quality than a stop of cleaner sensor would, and it costs nothing. It is the clearest example of why technique beats gear in this genre — the photographer who reads the histogram out-shoots the one with the more expensive body every single night.
You do not learn this all at once, and you should not try to. A sane progression looks like this: spend your first few sessions shooting untracked single-frame nightscapes with gear you already own, learning manual focus on stars and the 500/NPF trailing limits until they are automatic. Once those are muscle memory, add stacking — shoot ten or twenty identical sky frames and average them in software for cleaner files without spending a krona. Only then, if deep-sky is pulling at you, add a star tracker and learn polar alignment.
Most photographers find the wide-field nightscape stage so rewarding they happily stay there for years, and that is a completely valid place to live — some of the most striking astro images ever made are single untracked frames of the galaxy over a landscape. The deep-sky world is deeper, more technical, and more equipment-hungry, and there is no rush to enter it. Walk the path in order, let each stage become comfortable, and the next purchase will announce itself when you genuinely hit the limit of what you have. That is the opposite of gear-acquisition disease, and it is how you end up with photos instead of a closet full of regret.
No. Most astrophotography that photographers want — Milky Way nightscapes and wide-field shots — is done with a normal camera, a fast wide lens, and a tripod. A telescope only becomes necessary for high-magnification deep-sky targets like galaxies and small nebulae.
Start in manual mode: aperture wide open or stopped down one stop, ISO 3200, and shutter speed from the 500 rule (about 20 seconds at 24mm). Shoot RAW, focus manually on a magnified bright star, and turn off in-body stabilization on a tripod.
No. Full-frame gives roughly one stop of cleaner high-ISO and a little more shadow recovery, but APS-C bodies produce printable nightscapes routinely. The lens and a dark sky matter far more than sensor size for a beginner.
A star tracker is a small motorized mount that follows the sky’s rotation so stars stay sharp during long exposures. You do not need one for foreground nightscapes, but it is the key purchase for deep-sky targets and long single exposures at longer focal lengths.
A wide, fast lens — roughly 14-24mm at f/1.4 to f/2.8 on full-frame, or 10-16mm on APS-C. Width lets you use a longer shutter before stars trail, and a fast aperture keeps ISO down. Watch for coma, which smears edge stars on cheap fast glass.
Shoot during a new-moon window when the galactic core is above the horizon, from a dark site away from light pollution. The season depends on your latitude; at northern European latitudes the core is best from spring through autumn, outside the bright summer twilight.
The fastest way to your first real astrophotograph: put a fast wide lens on any…
A star tracker is a small motorized mount that rotates your camera at the same…
The best camera for astrophotography is the one with clean high-ISO performance, a true manual…
Leave a Reply