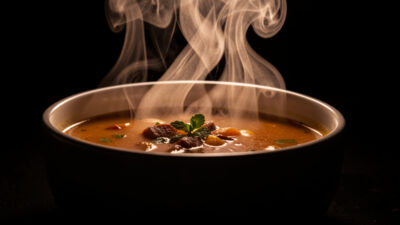
Steam, Drips & Freshness: Honest Appetite Tricks
You can make food look freshly served without lying about it: backlight real steam against…
For night photography, use manual mode with a wide aperture (f/1.4 to f/2.8), shutter speed between 10-30 seconds depending on subject, and ISO 1600-6400 on full-frame or 800-3200 on APS-C. Shoot in RAW and disable long-exposure noise reduction to speed up your workflow between shots.
I learned the hard way why you never trust a camera meter after dark. My first night out with the X-T5, I let the evaluative metering decide exposure for a bridge scene — every frame came back 3 stops underexposed because the meter averaged a bright streetlamp with deep shadow and split the difference into mud. Night photography demands manual control because auto-exposure systems cannot meter accurately in near-darkness. Set your white balance manually to approximately 4000K for cityscapes (neutralizes orange streetlights) or 3800K for astrophotography (balances sky color). Fine-tune in post-processing from your RAW file.
Use a sturdy tripod — night exposures of 10-30 seconds make handholding impossible. A remote shutter release or 2-second self-timer eliminates vibration from pressing the shutter button. Turn off image stabilization when tripod-mounted, as stabilization systems can introduce micro-vibrations during long exposures. On my carbon travel tripod with geared head, I also weigh down the center column hook with my camera bag on windy nights — a 5-pound bag transforms a light tripod into a solid platform.
The sensor format you shoot determines the ISO ceiling, depth of field at a given aperture, and how aggressively you can push files in post. Across the two systems I shoot — a 40MP APS-C X-T5 and a full-frame a7 IV — the difference is most visible above ISO 3200, where full-frame files pull ahead by roughly 1 stop in shadow cleanliness. The table below breaks down real-world night performance across formats.
| Sensor Format | Usable ISO Ceiling | DOF at f/2.8 (24mm) | File Push Latitude | Best For |
|---|---|---|---|---|
| Full-Frame (36×24mm) | 6400-12800 | Shallower — easier subject separation | +2.5 stops in shadows | Milky Way, deep-sky, extreme low light |
| APS-C (23.5×15.6mm) | 3200-6400 | Deeper — more foreground in focus | +1.5 stops in shadows | Cityscapes, light trails, star trails |
| Micro Four Thirds | 1600-3200 | Deepest — landscape-friendly | +1 stop in shadows | Blue-hour cityscapes, tripod-dependent work |
| Medium Format (44×33mm) | 12800-25600 | Thinnest — precise focus critical | +3 stops in shadows | Ultra-clean astro prints at 44″ or larger |
I shoot my night work primarily on the X-T5 because the 40MP sensor at APS-C pixel density punishes any lens weakness — soft corners and coma don’t hide. When the ISO demands exceed 3200, I switch to the a7 IV and gain that extra stop of clean shadow recovery without noise reduction smearing fine star detail. If you only run one system, a fast f/1.4 prime on APS-C beats a slow f/4 zoom on full-frame for night work every time — glass speed matters more than sensor size below ISO 6400. See my full-frame vs APS-C sensor comparison for the full breakdown across all shooting conditions.
The 500 Rule determines your maximum shutter speed before stars begin to trail: divide 500 by your focal length. A 24mm lens allows up to 20.8 seconds (500/24) before star movement becomes visible. For pinpoint stars, stay at or below this calculated limit — use the NPF rule for more precise results on high-resolution sensors.
Focus manually on a bright star using live view at maximum magnification. Zoom in 10x on the rear screen, adjust focus until the star is a pinpoint (not a blob), then tape the focus ring to prevent accidental movement. Autofocus fails completely in darkness — manual focus is mandatory for astrophotography. On my 16-55mm f/2.8 at the wide end, I pre-focus at infinity during twilight and tape the ring — once the Milky Way core rises, I don’t touch focus again. See my complete manual focus guide for astrophotography for a step-by-step workflow.
Shoot during new moon phases for the darkest skies, and avoid light pollution by traveling at least 60 miles from major cities. Use the Light Pollution Map to find nearby dark sky locations. The difference between a city-suburb sky and a Bortle Class 3 dark sky is staggering — the Milky Way is visible to the naked eye in truly dark locations. From my usual site an hour outside Stockholm, a Bortle 4 sky reveals the galactic core as a faint cloud even before the first exposure. The beginner astrophotography guide walks through scouting your first dark-sky session from scratch.
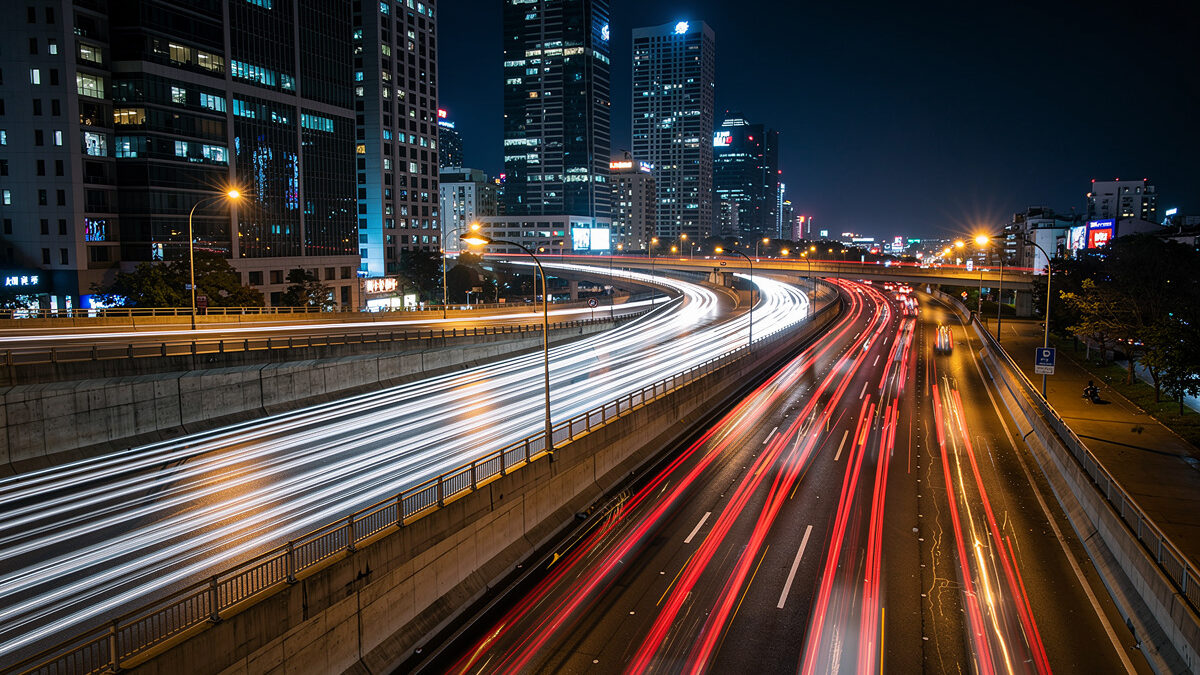
Light trails from vehicles require shutter speeds of 5-30 seconds at ISO 100-400 and apertures of f/8-f/16. The narrow aperture and low ISO force the long exposure that transforms moving headlights and taillights into continuous streaks of light across the frame. Position yourself on a bridge, overpass, or hillside overlooking a busy road.
Compose your shot and pre-focus on a static element (building, sign, road surface) before traffic arrives. Once focus is locked, switch to manual focus to prevent the camera from hunting during the exposure. Use a remote shutter or intervalometer for consistent timing between exposures.
Vary shutter speed to control trail length: 5 seconds creates short, dense trails from fast-moving traffic. 15-30 seconds produces long, sweeping curves from vehicles following road bends. Stack multiple exposures in Photoshop (File > Scripts > Load Files into Stack > Mean blend mode) to combine trails from several cycles of traffic into one image. The same stacking logic applies to daytime long exposure photography with ND filters — the technique translates directly between day and night.
A fast wide-angle lens (14mm f/2.8, 24mm f/1.4, or 16-35mm f/2.8) is the primary night photography tool. The wide aperture gathers maximum light in minimum time, keeping ISO lower and exposures shorter. A 24mm f/1.4 prime is the single best lens for both astrophotography and night cityscapes.

A sturdy tripod rated for your camera weight plus lens weight is essential — cheap tripods vibrate in wind and ruin long exposures. Carbon fiber tripods weigh less for hiking to remote astro locations but cost more than aluminum alternatives. A ball head with an Arca-Swiss plate allows quick mounting and precise positioning. I shoot on a carbon travel tripod with a geared head — the geared mechanism lets me nudge composition by fractions of a degree without the sag-and-rebound you get from a loose ball head at steep angles. For a deeper dive, my tripod guide for mirrorless cameras rates specific models by stability-to-weight ratio.
An intervalometer (remote shutter with timer programming) enables exposures longer than 30 seconds — necessary for star trails and deep-sky astrophotography. It also automates time-lapse sequences. Most cameras have built-in intervalometers, but a dedicated unit ($20-$50) provides more reliable control and does not drain the camera battery on menu operations. When I shoot overnight star-trail sequences of 200+ frames, I power the camera from a LiFePO4 battery pack — a single 100Wh unit runs the X-T5 for 8+ hours of continuous intervalometer operation through a sub-zero night.
What makes the biggest difference in your results is lens speed. A f/1.4 prime gathers 4x more light than an f/2.8 zoom — that’s two stops of ISO you don’t have to pay. If you are building a night kit from scratch, spend 70% of your budget on the lens and 30% on the body. I cover how to evaluate coma, astigmatism, and corner sharpness in the coma and astigmatism lens guide, which is the first thing I check when a new prime arrives.
Star trails require either a single ultra-long exposure (30+ minutes) or, more practically, a stack of 100-300 shorter exposures (15-30 seconds each) combined in post-processing. Stacking produces cleaner results because each individual exposure keeps ISO low (800-1600), and the stacking software averages out noise.
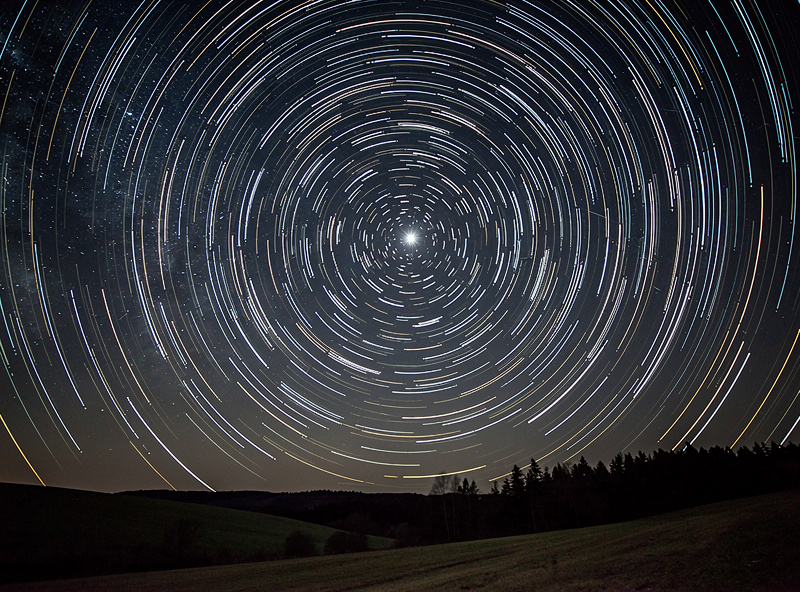
Point your camera at Polaris (the North Star) for circular star trails radiating from the center of the frame. Point away from Polaris for diagonal streaks. Compose with a strong foreground element — a lighthouse, tree, rock formation — anchored at the bottom of the frame to provide a stationary reference against the moving stars.
Use StarStaX (free software) or Photoshop’s statistics stack mode to combine your sequence. Set blend mode to “Lighten” so each frame’s bright pixels (stars) show through while dark pixels (noise) are suppressed. The resulting image reveals the Earth’s rotation as elegant arcs across the sky. If you want pinpoint stars instead of trails, a star tracker eliminates the 500 Rule entirely — it rotates the camera with the Earth so you can shoot 2-4 minute exposures at base ISO with zero star movement.
Cityscapes photograph best during blue hour — 20 to 40 minutes after sunset — when the sky retains deep blue color that contrasts with warm artificial lights. Shooting during true darkness produces a black sky that looks flat and uninteresting. The blue hour window creates dimensional, colorful city images.
Use f/8-f/11 for maximum sharpness across buildings and ISO 100-400 for clean files. Shutter speeds during blue hour typically fall between 1-15 seconds depending on available light. Expose for the highlights (buildings and lights) and let shadows fall — you can recover shadow detail from RAW files but cannot recover blown highlights.
Look for reflections in water (rivers, harbors, puddles) as foreground interest. Wet streets after rain reflect colorful lights and double the visual impact of any cityscape. Shoot from bridges, observation decks, or elevated parking garages for the high vantage point that separates professional cityscapes from street-level snapshots. This is where the Swedish long-light seasons pay off — during summer, blue hour stretches past 45 minutes at our latitude, giving me time to work a single scene through three or four compositional variations before the sky goes black. For more on shaping natural light, read how I read and shape daylight for any scene.
The first time I shot the Milky Way, I framed a perfect composition but forgot to check my aperture ring — 200 frames at f/11 because I bumped the ring hiking to the site. Every frame was 3 stops underexposed and shot through with noise after pushing in Lightroom. Now I tape my aperture ring to wide open before I leave the car. It is the cheapest insurance in night photography.
Another mistake: trusting the LCD brightness. Your rear screen at full brightness in pitch darkness lies to you — images look perfectly exposed at -1.5 stops underexposure because your eyes have adapted to darkness. I learned to use the histogram instead, and to set my review brightness to “manual -2” so the LCD roughly matches what the file actually contains. ETTR (expose to the right) works at night too — push the histogram as far right as you can without clipping highlights, then pull exposure down in post. The resulting shadow noise floor drops visibly.
The third mistake is forgetting to disable long-exposure noise reduction for star-trail sequences. LENR takes a second dark frame for every exposure — a 30-second exposure becomes a 60-second cycle. With 200 frames in a sequence, LENR doubles your shoot time from 100 minutes to 200 minutes. By frame 150 your battery is dead and the sequence is ruined. Disable LENR and shoot one dark frame manually at the end of a sequence — apply it to all frames in post. More on RAW workflow choices in my RAW processing guide.
Reduce color noise first — night images shot at high ISO develop colored speckles in shadow areas. Lightroom’s color noise reduction (Detail panel > Color > 25-50) handles this cleanly. Luminance noise reduction should be applied conservatively (20-30) to avoid smearing fine detail in buildings and stars.
For astrophotography, use dedicated stacking software like Sequator (free, Windows) or Starry Landscape Stacker (Mac) to align and stack multiple exposures. Stacking reduces noise by the square root of the number of frames — 16 frames reduce noise by 4x, 64 frames by 8x. This is the single most effective noise reduction technique available. I build the complete workflow — from import through export — in my full photo editing guide and in the Lightroom Develop Module walkthrough.
Apply selective white balance adjustments to mixed-light scenes. Cityscapes often combine warm sodium streetlights, cool LED panels, and neutral building lights. Use the HSL panel to shift orange tones toward yellow (warmer) or reduce orange saturation entirely, creating a more unified color palette across the frame. For astrophotography frames, I pull the sky color temperature toward 4500K in post — it removes the muddy brown cast that Lightroom’s default profile applies to night-sky RAWs and restores a natural deep blue-black sky.
If I were starting night photography today, here is what I would do. Spend your first night working one scene — one composition, one lens, one subject — and shoot it through the entire blue-hour-to-darkness transition. You learn more from 100 frames of the same bridge at 10 different exposure combinations than from chasing five locations in one night. Review every frame the next morning on a calibrated monitor. The frames you thought were perfect on the LCD will teach you more than any tutorial.
Start with a single-lens astro session before you add a star tracker — learn what your widest prime can do at f/1.4, f/2, f/2.8 before you double your kit weight and complexity. The best night photography accessory is a headlamp with a red LED mode. The second best is a pair of insulated gloves — standing still for 3 hours at 2am near a Swedish lake in October teaches you that real quick.
Night photography rewards preparation and punishes improvisation. Check moon phase, weather, light-pollution map, and sunrise time before you pack. Arrive during daylight to scout composition and pre-focus. Then wait. The light will come — it always does, about 40 minutes after sunset — and the camera that spent the afternoon on the tripod, focused and framed, is the one that gets the shot.
Start at ISO 3200 on full-frame or ISO 1600 on APS-C for most night subjects. Increase to ISO 6400 (full-frame) or 3200 (APS-C) if shutter speed drops below your minimum. Use AI noise reduction in post-processing to clean high-ISO files effectively up to ISO 12800.
The 500 Rule calculates maximum shutter speed before stars trail: divide 500 by your focal length. At 24mm, you get 20.8 seconds maximum. For high-resolution sensors (45MP+), use the stricter NPF rule instead, which accounts for pixel density and produces sharper pinpoint stars.
Full-frame cameras perform 1-2 stops better in low light due to larger pixels, but modern APS-C bodies produce usable night images at ISO 1600-3200. The lens matters more — a fast f/1.4 prime on APS-C outperforms a slow f/4 zoom on full-frame for night work.
Use live view at 10x magnification and manually focus on a bright star or distant light until it appears as a pinpoint. Autofocus systems cannot lock in darkness. Once focused, tape the focus ring or switch to manual focus mode to prevent accidental adjustment between shots.
During new moon phases for darkest skies, between 10pm and 4am when the sun is furthest below the horizon. Summer months (June-August in the Northern Hemisphere) position the Milky Way core high in the sky for the most dramatic astrophotography compositions.
Stack multiple exposures using software like Sequator or Starry Landscape Stacker — stacking 16 frames reduces noise by 4x. In single-frame editing, apply Lightroom color noise reduction at 25-50 and luminance reduction at 20-30. Use AI denoise tools for ISO 6400+ files.
Continue building your night and low-light photography skills:
You can make food look freshly served without lying about it: backlight real steam against…
For landscape photography, use aperture priority mode at f/8 to f/11, ISO 100-400, and focus…

Great food styling costs almost nothing: a black foam board for negative fill, one good…
Leave a Reply