Mobile Photo Editing: Real Edits From Your Phone
Mobile photo editing is no longer a toy. Apps like Lightroom Mobile and Snapseed open…
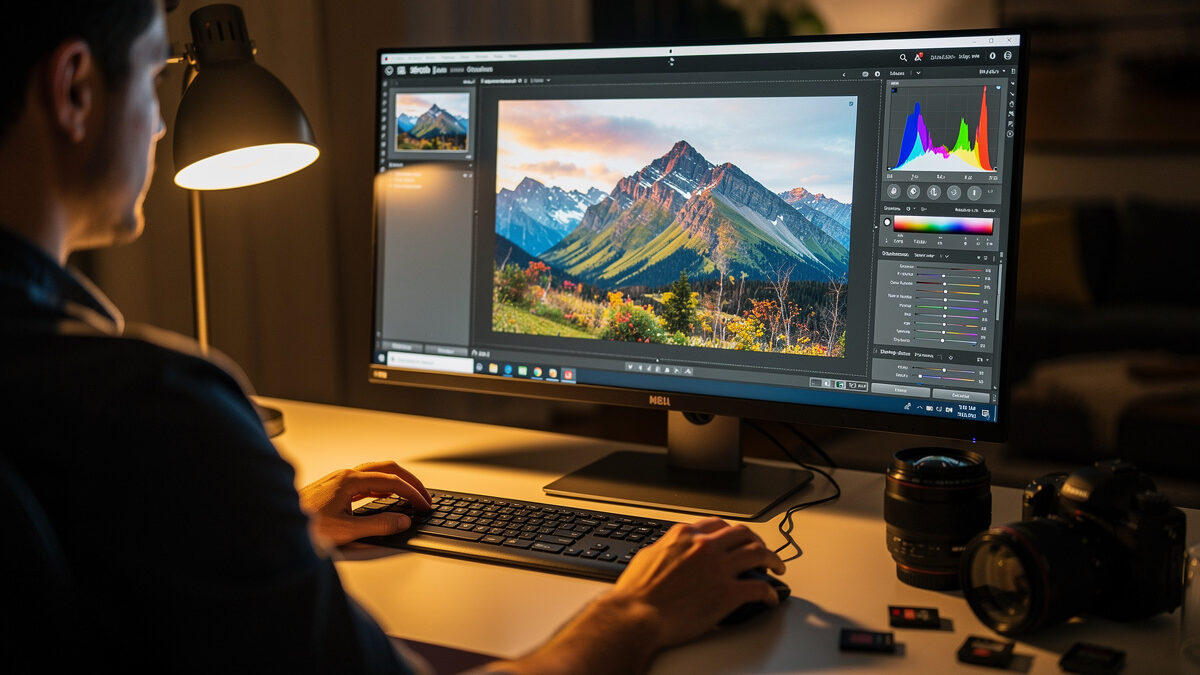
Photo editing is the develop stage that turns a correctly exposed RAW file into the image you actually saw in the field. A sensible post-processing workflow has five stages: import and back up, cull to keepers, develop globally (white balance, exposure, contrast), refine locally and stylistically, then export sharpened for the final medium. Get that order right and editing stops being guesswork.
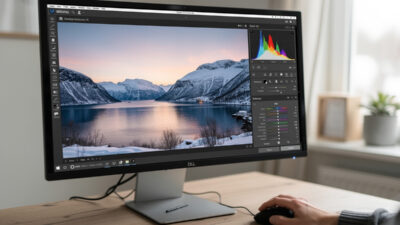
I shoot two systems side by side — a 40MP Fujifilm X-T5 and a Sony a7 IV — and every frame from both lands in Lightroom Classic before it goes anywhere. At that pixel pitch the X-T5 punishes sloppy editing the same way it punishes soft glass: oversharpen and you see it, crush the shadows and the noise crawls. This guide is the editing system I run across the mounts, written so a beginner can follow the sequence and a pixel-peeper can argue with my choices. It links out to deeper guides on each stage — Lightroom, RAW conversion, culling, color, retouching, and editing on a phone — so you can drill into whichever step is costing you.
A RAW file is not a photo — it is sensor data with the manufacturer’s default interpretation applied for the preview. Every JPEG your camera makes is already “edited” by in-camera processing you did not choose. Shooting RAW just moves those decisions to your desk, where you have far more latitude.
The practical reason is headroom. A 14-bit RAW holds far more tonal information than the 8-bit JPEG, which means you can recover a blown sky or lift a shadowed face that a JPEG would have thrown away. The way I expose — ETTR, pushing the histogram right without clipping — only pays off if I develop the file afterward to bring the brightness back down. Editing is not fixing mistakes; it is finishing a deliberate capture. The discipline is restraint: the goal is the scene as it felt, not a saturated cartoon of it.
The single biggest improvement most people can make is doing the steps in order. Editing out of sequence — sharpening before you crop, color grading before white balance — means redoing work and fighting yourself. Here is the order I run on every shoot, regardless of system.
1. Import and back up — copy cards to the working drive and immediately to a second location before touching anything. 2. Cull — reject the duds, flag the keepers, before you spend a minute developing. 3. Global develop — white balance first, then exposure, contrast, highlight/shadow recovery, applied to the whole frame. 4. Local and creative — masks, dodging and burning, color grading, retouching. 5. Export — resize and sharpen for the specific output, web or print. Each stage feeds the next, and skipping the early ones makes the later ones harder.
You do not need the most expensive tool; you need one you will actually learn. The honest split is between a catalog-based developer that handles thousands of files (Lightroom Classic, Capture One, the free darktable) and a pixel-level editor for heavy compositing (Photoshop, the free GIMP, Affinity Photo). Most photographers live 90% in the developer and visit the pixel editor only for the jobs masks cannot do.
I run Lightroom Classic for develop and rarely open Photoshop — my work is single-frame landscape and product, not deep composite retouching. If you are starting out, pick one catalog developer and stay in it for six months before judging it. Tool-hopping is the editing equivalent of GAS: it feels like progress and teaches you nothing.
| Software | Type | Cost model | Best for | Learning curve |
|---|---|---|---|---|
| Lightroom Classic | Catalog developer | Subscription | Most photographers, large libraries | Moderate |
| Capture One | Catalog developer | Subscription or perpetual | Tethered studio, color control | Steeper |
| darktable | Catalog developer | Free, open source | Budget RAW workflow | Steeper |
| Photoshop | Pixel editor | Subscription | Compositing, heavy retouch | Steep |
| Affinity Photo | Pixel editor | One-time purchase | Photoshop alternative, no subscription | Moderate |
| Phone apps (Lightroom Mobile, Snapseed) | Mobile developer | Free / freemium | On-the-go edits, social | Easy |
You cannot edit color you cannot see correctly. An uncalibrated monitor — especially a cheap laptop panel running too blue and too bright — means every color and exposure decision you make is wrong relative to everyone else’s screen and to print. This is the cheapest meaningful upgrade in editing, and the one beginners ignore for years.
A hardware colorimeter measures your screen and builds a profile so neutral grey reads as neutral grey. I calibrate roughly monthly because panels drift. Pair that with editing in consistent, dim ambient light — not next to a sunny window that fools your eye into under-correcting. If you only buy one thing for editing, buy a calibrator before you buy a faster computer.
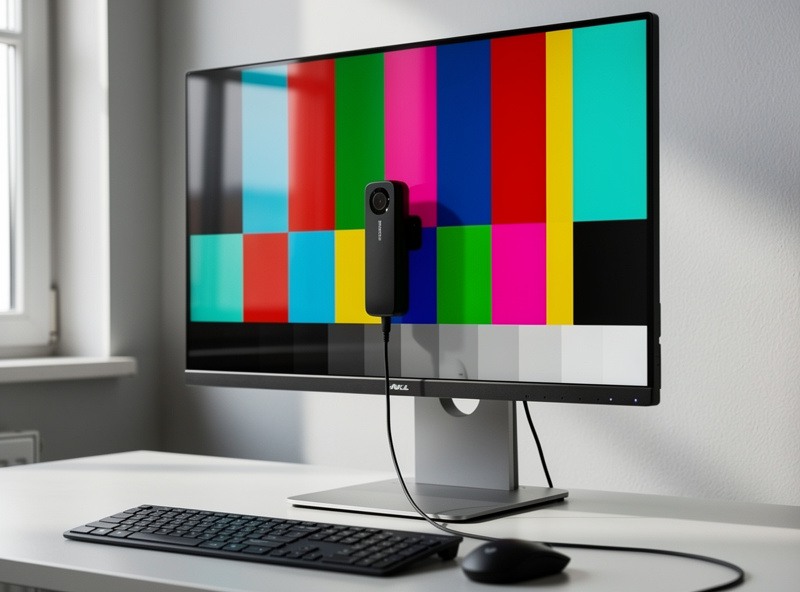
This is the one place I add affiliate links to this guide, because the hardware genuinely matters and is genuinely sold on Amazon. As an Amazon Associate I earn from qualifying purchases. For color-accurate editing, a hardware monitor color calibrator is the single highest-leverage tool, and an IPS photo-editing monitor with wide gamut beats a glossy laptop panel for serious work. I link these because they change the output, not because they pad the page.
White balance comes before everything, because every later color and contrast decision depends on a neutral starting point. Set it by eye on something you know is neutral, or with the eyedropper on a grey card if you shot one. Get the file looking honest before you make it look stylish.
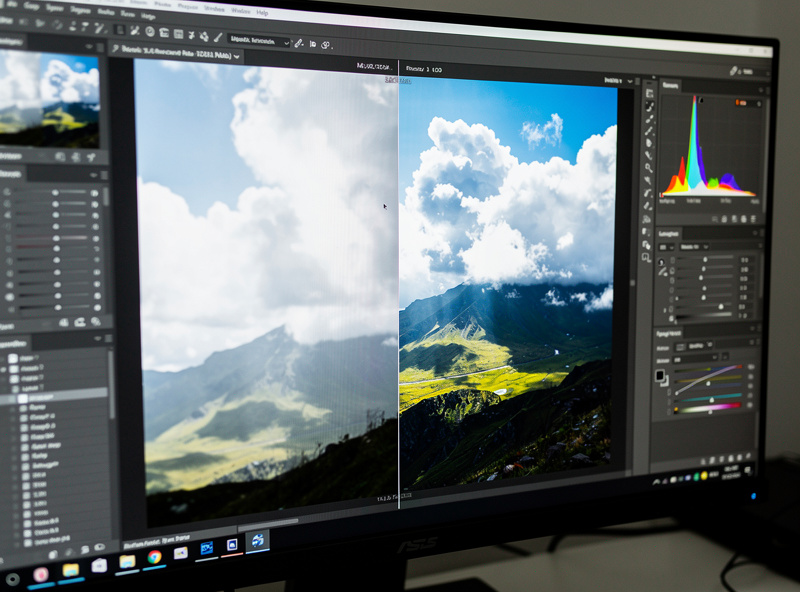
Then exposure and tone: set overall brightness, recover clipped highlights, lift shadows only as far as the noise allows, and shape contrast with the tone curve rather than the blunt contrast slider. On the 40MP files I am careful lifting shadows — that sensor is clean but not magic, and aggressive shadow pushes reveal pattern noise. The order inside this stage matters too: white balance, exposure, highlights/shadows, then contrast and clarity last. This is also where the RAW processing headroom pays off — the recovery latitude only exists because the file is RAW.
Global edits get the file 80% there; local edits and grading are the last 20% that make it yours. Masking — selective adjustments on a subject, a sky, a face — is where modern editors have improved most, with AI subject and sky masks that used to take ten minutes of manual brushing.
This is also where color grading lives: pushing shadows cooler and highlights warmer for a cinematic look, or using HSL to tame one screaming color without nuking the rest. Dodging and burning — locally brightening and darkening — is the oldest darkroom technique and still the most powerful for guiding the eye. Restraint again: a good grade is felt, not seen. If a viewer’s first reaction is “nice editing,” you overdid it.
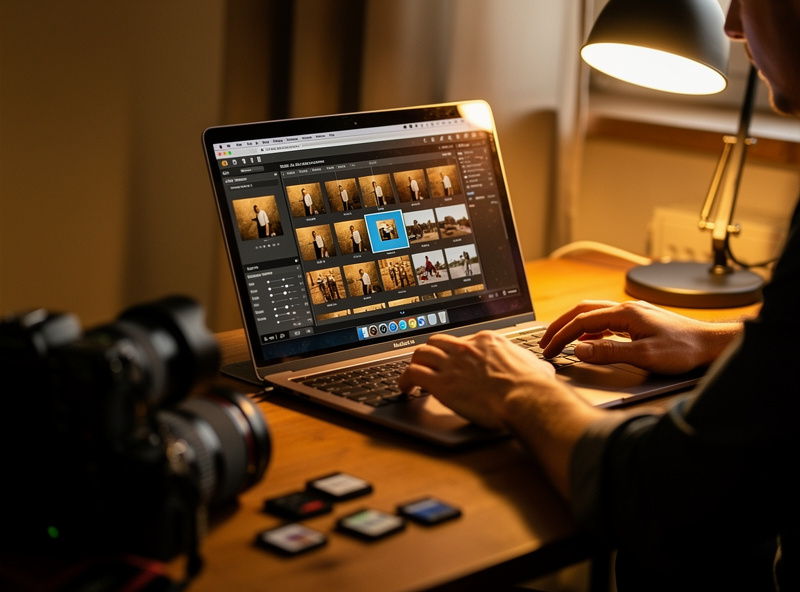
Editing 600 frames is a recipe for burnout and inconsistency; editing the 40 keepers is a pleasure. Culling — ruthlessly rejecting the near-misses and picking the strongest frame from each burst — happens before any develop work, so you never waste time polishing an image you will not use.
My culling pass is fast and binary: full-screen, flag or reject, move on, do not pixel-peep yet. A second pass picks between the survivors — the full culling workflow is its own discipline worth learning before you develop a thing. The hardest skill is killing a technically fine image that simply is not as good as the one next to it. Good culling is what separates a tight portfolio from a bloated catalog, and it is the stage beginners skip entirely.
The last stage is output-specific: the same edited file should be exported differently for a 4K screen, an Instagram post, and a 24-inch print. Resize first, then apply output sharpening sized to the destination — web images need a touch, large prints need more, and the amount depends on viewing distance.
Sharpening is not one slider. There is capture sharpening (countering the sensor’s anti-alias softness during develop) and output sharpening (applied last, for the medium). Apply output sharpening to the resized file, never the full-res master, or you will sharpen detail you are about to throw away. I shoot for the print and crop for the page, and I export a separate file for each — the sharpening that looks crisp on screen looks harsh on paper.
A catalog you cannot search is a shoebox of negatives. The import stage is where editing either scales or collapses: a consistent folder structure, keywords or flags applied on ingest, and a backup written before you touch a single slider. I import by date into year/month folders, flag keepers during the cull, and let the catalog handle the rest — I almost never hunt for a file because the catalog knows where everything is.
Backup is non-negotiable and it is part of editing, not separate from it. My rule is the standard one: the working files live on a fast drive, a second copy lands on a local NAS, and a third sits offsite. RAW files are irreplaceable in a way that a re-shootable subject usually is not, and a single failed drive should never cost you a shoot. I have watched photographers lose a year of work to one dying SSD with no second copy — the editing skill in the world does not bring those frames back.
The other half of organization is non-destructive editing. Every catalog developer I named earlier edits the RAW non-destructively: it stores your adjustments as instructions and never overwrites the original sensor data. That means you can revisit a five-year-old edit, change your mind, and re-export with no loss — which is exactly why I keep the RAW masters and never flatten them into the edited JPEG as my only copy. Treat the RAW as the negative and the export as a print: you can always make a new print, but you cannot un-flatten a JPEG.
Presets are saved bundles of develop settings — a starting point, not a finished edit. Used well, they speed up a consistent look across a shoot; used badly, they are why so many beginner edits look identically over-graded. The trap is treating a one-click preset as the answer rather than as the first move you then correct per image.
The honest workflow is to build your own presets from edits you already trust. After I grade a landscape the way I like it, I save those moves as a preset, apply it to the rest of the set, then adjust each frame individually because the light was never identical between shots. A preset gets you to a coherent baseline fast; the per-image tweaks are still the real work. Camera profiles are the layer beneath presets — they decide how the RAW is interpreted before any slider moves, and choosing a neutral profile rather than a punchy one gives you a more honest canvas to grade from.
Where presets genuinely earn their keep is batch consistency. If you shot 200 frames of an event under one lighting setup, a well-built preset plus a quick per-frame exposure nudge will get you a uniform set in a fraction of the time. Where they fail is mixed light: drop a moody twilight preset on a midday frame and you fight it harder than if you had started from scratch. Match the preset to the conditions, or do not use one.
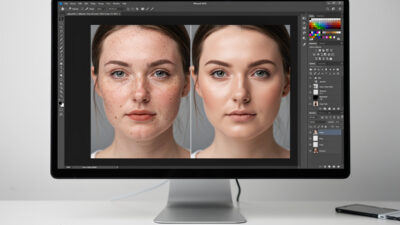
Retouching covers everything from cloning out a dust spot to softening skin, and the line between honest and dishonest editing runs straight through it. Removing a sensor dust spot or a stray plastic bag at the edge of a landscape is finishing; reshaping a face or deleting things that materially change the story is a different decision you should make on purpose. I keep my own work to the honest side: clean the frame, do not rebuild reality.
The technical core is healing and cloning — sampling clean pixels to cover unwanted ones — plus frequency separation for skin work, where texture and tone are edited on separate layers so you smooth color without turning skin to plastic. For portraits the goal is the person on their best ordinary day, not a mannequin. The plastic-skin look that screams “edited” comes from blurring texture away; keeping pores while evening out tone is what reads as natural. This is the one area where I genuinely defer to dedicated portrait retouchers, who run far deeper dodge-and-burn workflows than my single-frame landscape work ever needs — my guide to natural portrait retouching covers the honest, texture-keeping version of it.
Mobile editing is no longer a toy. Lightroom Mobile and Snapseed handle RAW files from many cameras and give you real curves, masking, and color tools on a screen you can edit on a train. The catch is that screen: a phone panel is small, uncalibrated, and usually set too bright, so a phone edit needs a sanity check on a real display before you trust it.
I use the phone for triage and rough edits in the field — flagging keepers on the camera-to-phone transfer, dropping a quick grade on a frame for a client preview — then finish on the calibrated monitor at home. For travel and social-only work, a phone is genuinely enough — I cover the whole approach in my mobile photo editing guide. For anything headed to print, it is the first draft, not the final.
The mistakes are predictable and all stem from doing too much. Oversaturation — orange skin and radioactive grass — reads as amateur instantly. Crushed blacks and blown whites throw away the headroom you shot RAW to keep. Oversharpening produces halos along high-contrast edges that scream “edited.” Heavy-handed clarity makes skies look like an HDR fever dream.
The fix for all of them is the same: edit, walk away, come back with fresh eyes, and pull every effect back by a third. The most experienced editors I respect use fewer sliders, not more. And edit on a calibrated screen in consistent light — half of all “bad editing” is really a miscalibrated display lying to a careful editor.
One more trap worth naming: editing to a trend instead of to the image. The teal-and-orange look, the crushed matte film fade, the heavy desaturated “moody” grade — each one was everywhere for a season and dates the photo the moment the trend passes. A clean, honest edit ages far better than a fashionable one. When I look back at my own catalog, the frames I am still happy with are the ones I edited toward the scene as it felt, not toward whatever look was filling my feed that month. Build the habit of asking “does this serve the photo, or am I just copying a style?” before you commit a grade.
No, but RAW gives far more editing latitude. A 14-bit RAW holds more tonal data than an 8-bit JPEG, so you can recover blown highlights and lift shadows the JPEG already discarded. For serious editing, shoot RAW.
Lightroom Classic for most people, or free darktable on a budget. Pick one catalog developer and stay in it six months before judging it. Tool-hopping teaches you nothing and feels like progress.
Almost always an uncalibrated monitor. A cheap or laptop panel often runs too blue and too bright, so your corrections are wrong relative to everyone else. A hardware colorimeter fixes this for the cheapest meaningful editing upgrade there is.
Import and back up, cull to keepers, then white balance, exposure, highlight and shadow recovery, then local masks and color grading, then export with output sharpening last. Editing out of order means redoing work.
For web and social, yes. Lightroom Mobile and Snapseed edit RAW with real tools. But a phone screen is small and uncalibrated, so phone edits should be checked on a calibrated monitor before anything goes to print.
If a viewer notices the editing first, it is too much. Oversaturation, crushed blacks, and halos from oversharpening are the usual tells. Edit, step away, then pull every effect back by about a third.
Editing is the back half of the craft; the front half is capture. If you are still dialing in the shot, my natural light photography guide covers shaping daylight so there is less to fix later, and the composition guide covers framing decisions no editor can rescue. For the files themselves, see how I choose memory cards and the landscape settings I expose to edit. Lens choice drives rendering too — start with prime vs zoom and types of camera lenses. And for the gear that carries it all, the essential accessories guide and tripod guide round out the kit. If you shoot portraits, pair this with my portrait lens recommendations; for low light, the night photography guide pairs capture with the editing here.

Mobile photo editing is no longer a toy. Apps like Lightroom Mobile and Snapseed open…
Lightroom for beginners comes down to one screen: the Develop module. Import your photos, cull…
Natural portrait retouching means cleaning up distractions while keeping the person looking like themselves —…
Leave a Reply